|
.: Filling in Chips :.
|
|
by Parker
|
|
|
| This is a step by step on filling in a chip and making it look all purty. I
am filling in a chip on a deck which is stained. The same principles apply
for a painted deck (and actually should be easier).
|
|
|
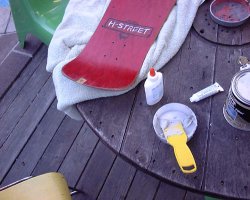
Firstly, a list of supplies. You need to get ahold of some bondo like
material. I have been using this stuff called "home fix" Universal Repair
Filler by a company called evercoat. It is a little more expensive than
bondo, and even though I have never used bondo, this stuff is great, dries
quickly and sands easily. Plus it can be combined with universal tints
(sold separately) to give a good starting base color to later play with. On
the example I give, I didn't use any tints, but I could see when it would
come in handy. You also need a putty knife. You want one that is
approximately the width of the chip to be filled. I bought a plastic one
for like 50 cents and trimmed it down with an x-acto knife to the exact size
I needed. Next you need to go to an art supply store to get the paint or
stain to match the deck. If you don't have a paintbrush, now is thime to
get one. You might want to bring the board with you and get some help from
a clerk. Fortunately, I had someone with wood experience recommend a stain
type called glaze made by a company called Plaid. Ok, finally you need fine
grit (I used 220) sandpaper, a small piece of unused grip tape, and then the
secret ingredient, a black sharpie marker (preferably fine point). Oh some
rags will come in handy too.
|
 Preperation
|
|
|
|
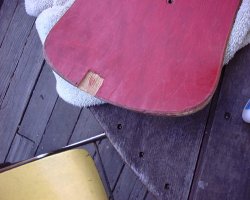
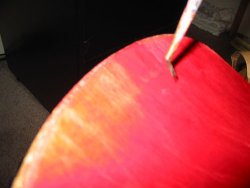
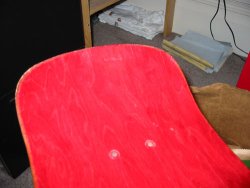
I am starting off with an old red stained hensley vista with a rather large chip on the top side of the tail.
|
 |
Get to a well ventialted area, 'cause the bondo/home fix stuff reeks. Mix
up the bondo/home fix as directed. If you use the Home fix the lid is a
convenient place to mix the stuff. |
 |
|
|
|
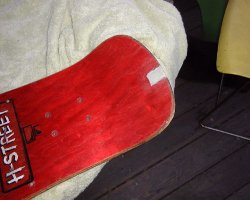
Using the putty knife spread the goop into the void, trying to get most of
it in the chip, as opposed to on the deck. Wipe away excess bondo (with
rags or your fingers) on the sides and do your best to make it similar to
the surrounding contours. You're just gonna have to use your best
judgement. Too much is fine on top, 'cause you're gonna end up sanding a
lot of it down later anyway. Just try your best to isolate the problem and
not spread a bunch of bondo all over the top of the deck where it isn't
needed.
|
|
|
| Depending on how long it takes to dry, you might want to try pushing the
bondo around as it dries with your fingers to make it better suit the board.
Initially when you apply this stuff it isn't easy to work with, but over
time it becomes more malleable. Once you are satisfied, you should let it
dry overnight.
|
|
| As an aside, the first time I did this, I didn't mix the Evercoat stuff and
the hardender to the correct proportions and it took a long ass time to dry,
in fact even after several days it never fully solidified. Follow the
mixing directions carefully before you apply the stuff. I think overdoing
the hardener is better than not enough.
|
|
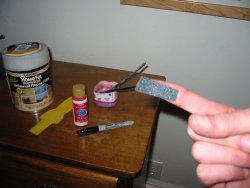
| Once it is dry (try using your fingernail to make a small dent in it. If it
dents, you either didn't mix enough hardener, or you need to wait longer),
you want to sand this sucker down to make it nice and even. There are 2
stages to this. Using the gritty grip tape to shape it and then the finer
sandpaper to smooth it out and give it a fine textured surface to accept the
glaze or paint. So check it out, get the griptape (keep those scraps next
time!) and cut out a little rectangle, peel the backing and stick it to your
index finger and start shaping. It may sound hokey, but it worked for me.
Then I took some fine sandpaper, put a tiny, tiny amount of super glue on
the reverse side and stuck it to my finger for the final stage. Don't get
too worried about sanding the actual wood that surrounds the bondo'd areas.
You can later touch that up with the glaze. Do get worried about getting
the sandpaper off your finger.
|
|
|
|
|
Once you have it sanded to your satisfaction, grab your glaze/stain and
paintbrush and begin filling in. You'll probably need to use several coats
to make it match exactly. Also, it is a good idea to go beyond the bondo'd
area to help make it blend in. Don'ty worry, you'll get a feel for it once
you get started. Usually after it dries I lightly sand with the fine grit
and put another coat on. I have no idea if this helps, but I once read that
sanding between coats of paint help make the next layer go on more uniform.
|
|
|
| Ok, now, this is where that black sharpie comes in. I experimented with
this with all kinds of different stuff, and this seems to work best. If you
look at your deck, you'll notice that the stain kinda changes color based on
the colors of the wood and the pattern of the grain. It is generally is
darker in some areas. Right now you've got this bitchin stained deck and
then this solid rectangle where you just applied stain. It looks stupid.
Don't fret. Apply another coat of the glaze (so it is kinda wet and
smudgeable) then take the sharpie and paint up the end of your finger and
then smear it into the glaze. It'll take a few tries and experimentation,
but it works and looks pretty close to the wood grain. Let it dry and be
stoked.
|
|
|
|
| I haven't tried this technique yet for filling in railholes, but the same
principles would apply. Rock that restore shit Jordache!
|
|
|
|
 Please visit our friends!