| The first thing anybody has to do before beginning a skateboard restoration is a self-examination. Do you really want to do this? Do you want to risk taking a board that looks beaten up and turn it into an even bigger mess if you fail? Do you have the artistic abilities to pull this off? |
|
| Depending on the condition of the board you're working on, the answer to all of these questions should be "YES!". To quote the dude from the Water Boy; "You can doo eeeet!" |
|
The
first thing to do is find the board you want to
restore. ebay has tons of skateboards for sale in
variable states of disrepair. The biggest factor
in any deck restoration is the combination of your
skills and the material you have to work with. Finding
a board in good physical shape but without recognizable
graphics is almost useless. You have to ask yourself
what's more important, to have an original of the
deck or to have a good looking version of it? With
the right board, both are possible.
If you have access to a mint version
of the board you want to restore you're miles ahead of the game.
You have an exact model to work from.
If you don't have access to another board, stickers will often help,
as well as images downloaded from the net. Pictures on the net are useful,
but are typically frustratingly low in detail when you enlarge them.
Gathering your resources together before you start is probably a good idea.
|
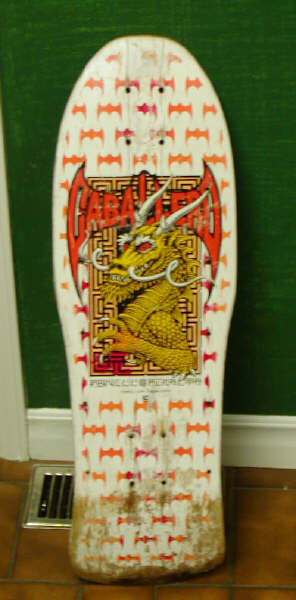 Before Restoration
|
|
|
| When you find a board you want to restore, the first thing to do is to restore the physical board. Any cracks, chips, or delaminations should be fixed first. If you get all paint happy and start working on the graphic before the board is repaired you'll regret it. Eventually you'll realize that even though you've painted over scratches, the impression is left in the wood and you'll want to fill it in and you'll just have to cover up all your new paint-work. |
|
| Delams can typically be reduced by pouring wood glue into the fissure and then applying strong pressure with clamps while the glue dries. To avoid pressure indentations, place blocks of appropriately sized soft wood (e.g. Pine) between your board and the screws of the clamp. The wider the wood you use, the less likely you'll get pressure sores on the deck, but the more likely the wood wont fit nicely given a boards warped dimensions with concave and kicktail. Clean up any overflow of glue immediately with a wet rag to avoid globs of glue and staining of the deck. |
|
| For chips and tail wear on boards I'll completely paint, I use a non-plaster polyfiller used for drywall repair. It comes in large and small tubs. Go to a hardware store and ask for help finding it. It's stronger and adheres better than plaster but sands and shapes just as well. |
|
| For decks where I don't intend to completely cover the board in paint, I typically just leave rail holes and tail wear alone. The board will look used but the polyfiller will make it look even worse, highlighting the areas you've repaired with bright white. Again, choice of deck to repair is important. On stained decks I don't intend to paint over, I've chosen to leave the rat-nuts in the holes rather than patching them over. The screws are dark and not very noticeable. They also appear to belong there when you look at the board. Filling them in just highlights the fact you've repaired the board and may even result in damage to the graphic when you're smearing it around and having to sand it smooth. |
|
 Spackling and Sanding Square
 |
Using the filler, fill in the cracks and smooth it out as best you can before letting it dry. This will save you time and sanding. I also use it on the edge of the board where there are dings from the board landing on its side, as well as on the tip of the nose and tail where skidding wear exists. This is the sloppiest part of any deck restoration so be careful and be patient. Don't put too much on at any one time as it will slide and dry into a big misshapen mass. It dries fairly quickly in terms of malleability so sit there and play with it for a while. Use a nice wide spackling tool to apply it. Using the plain of the deck, use the tool to make the new material flush with the rest of the board so you get a thickness that is equal to rest of the board.
|
|
|
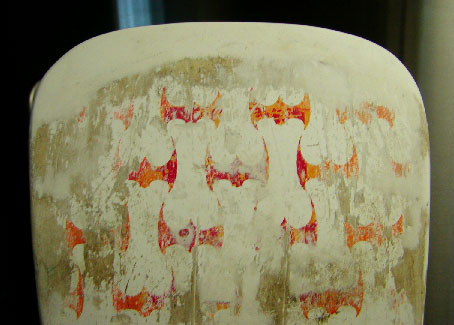
Build the tail and other damaged areas up slowly across a few days if you can't do it all in one application. Apply more compound over the dry compound from the day before. The stuff adheres well so you don't have to worry about fault lines developing within the reconstruction material. There are a few big mistakes you can make at this point.
- Don't cover up the graphics in the area of repair. You're using the original graphics as a template and if you cover them up you wont have anything to draw from.
- Don't put too much on at any one time. Build the material up over time.
- Don't start sanding before the material is COMPLETELY dry and hardened. Depending on how much you've used this can take several hours to even days.
|
|
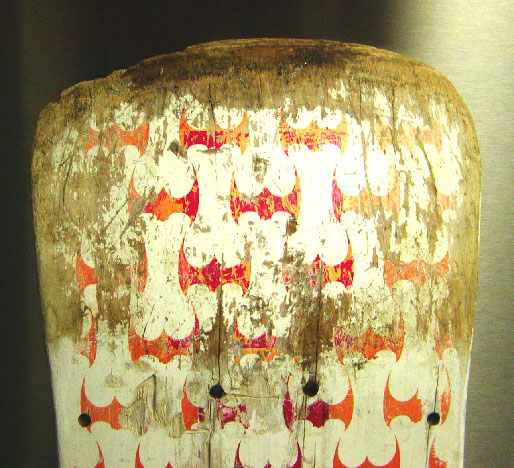
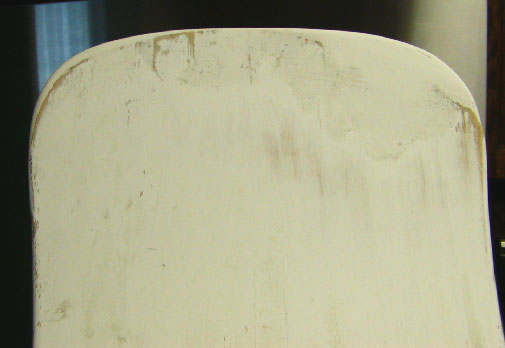
| Once the material is dry and hard, your board will look like ass. Don't worry. Get a nice foam sanding block from the hardware store if you can. Sanding paper wrapped around a block of wood can work just as easily. Use a rough grade to sand down and get the general shape of the board back and a fine grade for the final smoothing. The tail of the board is usually the hardest part to do, especially in older models due to their unique shapes. Symmetry is important to get. The only tip on this that I can give is patience, stepping away from the board and comparing both sides, and asking others "Does this look symmetrical to you?". You'd be surprised how wishing the thing was symmetrical can influence your perception. The biggest pain in the ass is if you sand off too much…. You now have to re-apply more compound to that area and start again. |
|
| If only one side is damaged, trace the tail onto a piece of paper. Using the truck holes, trace a line down the center of the paper so you know exactly where the midline is. Then flip the paper over and place it against the tail. Holding it up against the light you can see how the tail should look on the damaged side and how much more sanding you have left to do. |
|
| I've restored a huge misshapen freestyle nose that was pogo'd to death. You're not going to spend this much time working on a board only to end up skating it again. Don't worry about the strength of the compound; it'll hold up well. I haven't found reinforcement to be necessary but if you want, you can use drywall strips to act as a re-enforcement. This is a nylon-like messed strip of material. Place it over the wet compound and smooth the compound around it. This will act as a re-enforcement and you can apply more compound over it the next day. DON'T allow any of this reinforcement to extend beyond the area you intend to sand… this will lead to a final surface that will have the checkered texture of the reinforcing tape. |
 |
 |
 |
| Tail Before |
Tail during mid-Stage |
Tail Filled and Shaped
(top view) |
|
|
| **TIP**
With sanding, wear dirty clothes and go somewhere
where you can clean up easily. Women freak out when
you make a mess so make sure you can clean up after
yourself. |
|
| Now then! At this point your board is nicely sanded and if it weren't for the graphics, it would look like the shape is exactly the same as a mint NOS board. Right? Right!! |
|
|
Typically, companies
used relatively stock colours. Bring your board with you to an art
store and find colours that match the colours in your deck. I use
acrylic paints but model paint can probably be just as good. With
model paints, be sure to check on the luster you're using...you don't want to use
gloss or flat colours if they don't match what's on the board. For fine work, I
use permanent marker. It's faster and easier than painting with a fine brush.
Again, luster becomes an issue with marker. Marker tends to leave a quasi oil-gloss
finish. Experiment and see if this is acceptable to you or not. |
|
| If you're restoring an old boneite Powell deck, you're probably faced with a dull, shitty looking working surface to deal with. Worry not my friend! Get some oil and a cloth. Literally pour some oil onto the deck and rub it in with the rag. Within seconds your boneite looks totally brand new! Try avoiding the primary graphic though. Paint tends not to go over oil very well. |
|
| The next part is the most fun, most satisfying and most frustrating part of restoring a deck…. Painting. Go through your colours and match the colour on your deck as well as possible. Sometimes you can't get a colour match and you'll have to mix your own. One bit of advice I'd offer is to mix up enough paint! If you mix up a batch and run out you've shot yourself in the foot. You'll have to mix a new batch and you'll never get the exact colour again. Just mix up enough the first time and you'll save yourself a lot of headach
|
|
| If you find colours that are "sort of" similar to the colour you're looking for, try using it! It can't look worse than it did before! Before you had a big scrape with no paint… now you have an area that is slightly off to a similar colour. From a distance nobody will probably notice. The other option is to repaint every part of the board with that new colour. I did a Guerrero and repainted every bit of yellow on the board because I couldn't get a perfect match. With the new colour, the board looks great and there's no difference within the graphic with respect to colour in different parts of the board. I could have done damaged patches in this off colour but different flames would look different colours. Some purists will say that the board is now ruined. I disagree. If you love the board enough to restore it, you'll probably never sell it. So who cares if the colour is different than the original. It looks great, and that's all that matters. |
|
| The biggest temptation when painting is to jump into the primary graphic. You can do this if you want but when you're painting the background be careful not to splatter paint onto your Picasso you've been restoring for the last while. I typically go for the background first. If I splatter paint on the primary graphic it's no big deal because it's going to be restored later on. One fleck of paint is no big deal. If I get paint from the primary graphic onto the background, it's typically easier to fix up than vice-versa. |
|
|
In the case of some boards with a lot of detail and small areas that need to be painted, I tend to paint over everything in a thin wash. On a Caballero I've been restoring, I painted over the entire dragon to get the scale orange to match across the whole image. I then went back with a black marker and painted in over the black again. Black doesn't get covered over well with a thin wash… an advantage in this technique. Despite the fact I'd painted over all of the black, I could still see it through the orange and no detail was lost and I was able to achieve a uniform colour across the dragon. If you want to be neat about it, you could fill in each tiny area one at a time. It's up to you. This method has worked for me and it saved me a lot of time. In all likelihood, despite your best efforts you'll end up getting some paint in areas that will need to be touched up. You'll end up using the marker anyway despite your slow, methodical approach. Why go through the frustration and effort when this technique is faster, free flowing, and just as good? It's up to you though.
|
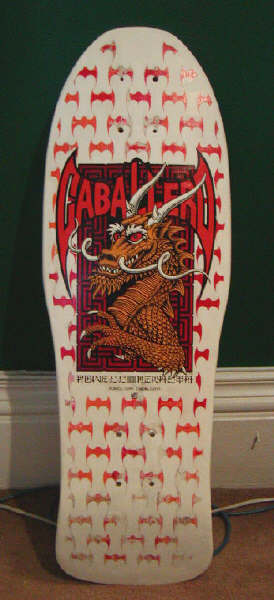 Mid-way through painting
|
|
|
| Hopefully these tips will help you out in any restoration projects you attempt. I'd suggest trying to restore a "lesser loved" deck than your favorite you have mounted on your wall. Just get a bit of experience under your belt before you tackle your Mona Lisa. Be patient and enjoy yourself. I've found this to be an incredibly rewarding and relaxing hobby. I hope you do too. Now stop worrying! Get your balls together and pick up a brush ya pansy! Remember…. It's only a useless wooden toy after all.*smile* |
 |
 |
COMING
SOON! |
| Before |
During |
Complete Restoration |
|
|
|
(* Art of Skateboarding would like to thank Matt for this fine article
and the work he put into creating it to share with all of you. We look for more great articles from him soon! In the meantime,
please check out some of Matt's great work in the Restoration Gallery. *)
|
Other Complete Restorations...
|
| Vallely Bolt by Matt "Jedi" DeAngelis |
 |
 |
 |
 |
| Brand New |
Used and Abused |
Mid-Process
(filler applied) |
Complete Restoration |
|
|
|
| Staab Chemist by The_Green_Monkey |
 |
 |
 |
 |
| Bottom - Start |
Bottom - Mid |
Bottom - Done |
Bottom - Detail |
 |
 |
 |
|
| Top - Start |
Top - Mid |
Top - Done |
|
|
|
|